How to Redirect Blog...
How to Redirect Blogger Website from HTTP to HTTPS?

How to Redirect Blogger Website from HTTP to HTTPS?
How to Redirect Blogger Website from HTTP to HTTPS?
Security is an important issue on the Internet. Using HTTPS (Hypertext Transfer Protocol Secure) is very important to increase the security of your website or blog. Using HTTPS encrypts the site’s data, making it difficult for hackers to access that data. If you are a blogger and your website is hosted on Blogger platform, redirecting your site from HTTP to HTTPS can be an important step. In this article, we will discuss how to redirect Blogger website from HTTP to HTTPS? And why is it important? I will discuss it in detail.
What is HTTPS and why is it important?
HTTPS is a secure version of HTTP, here the S stands for Secure. It encrypts data through SSL (Secure Sockets Layer) or TLS (Transport Layer Security). Through this, data is securely exchanged between the website’s server and the browser. Blogger is a popular platform owned by Google. It helps to create and manage blogs for free. By enabling HTTPS in Blogger, you can make your blog more secure and ensure the safety of your users. Important benefits of enabling HTTPS in Blogger are:
1. Data Protection: HTTPS encrypts user data, which protects against malicious attacks. Also by using HTTPS, the information of your blog visitors is protected.
2. Increased credibility: HTTPS gains users’ trust, as it indicates a secure connection.
3. SEO: Google gives priority to HTTPS sites, which helps to increase your blog’s search engine ranking.
How to Redirect Blogger Website from HTTP to HTTPS?
The process of enabling HTTPS on Blogger is very simple and can be done in a few simple steps. Below is the detailed step by step process:
1. Login to Blogger: First login to your Blogger account. If you don’t have a Blogger account, create a new account and set up your blog.
2. Select your blog: After login, select your blog from the dashboard on which you want to enable HTTPS.
3. Go to Settings Menu: After selecting the blog, select the “Settings” option from the left side menu.
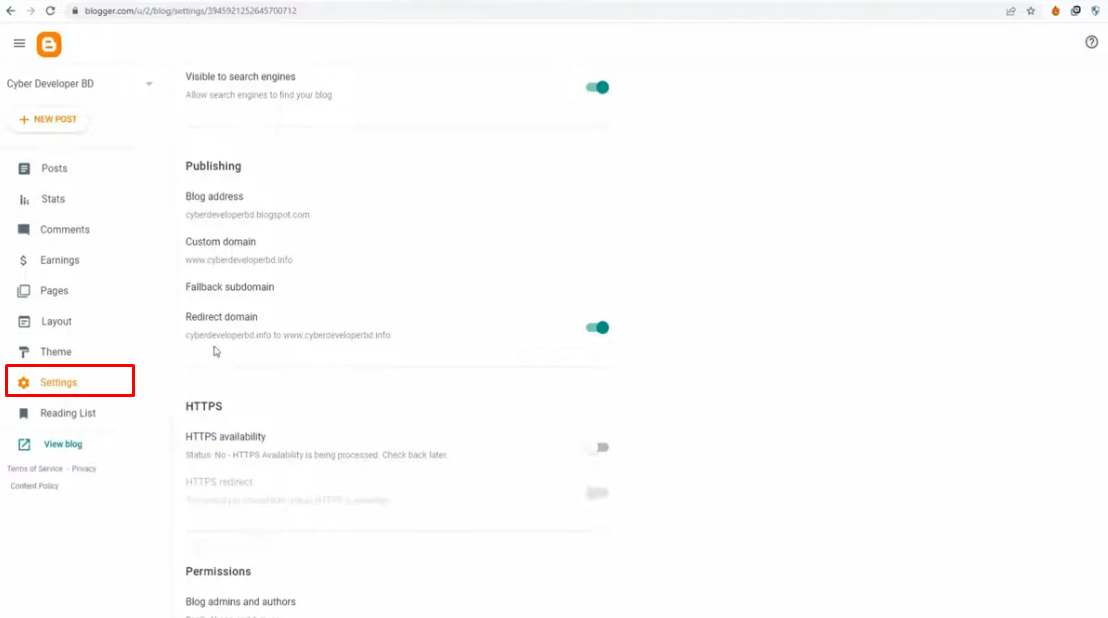
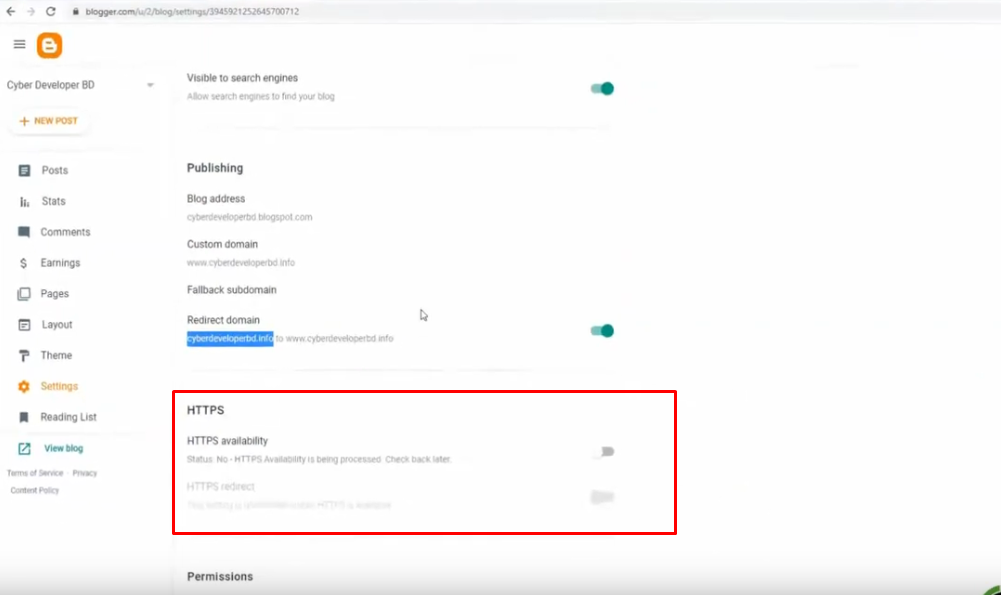
4. Find the HTTPS option: Find the “HTTPS” section in the Settings page.
5. Turn on HTTPS availability: In the HTTPS section you will see two options. The first is “HTTPS availability”. Turn on “HTTPS availability” so that your blog can support the HTTPS protocol.

6. Enable HTTPS redirect: The second option is “HTTPS redirect”. Turn on “HTTPS redirect” so that all HTTP links on your blog are automatically redirected to HTTPS.
Now you are done. Clean the history and cache of the web browser you are using. Now wait some time then visit your website. Your website will look secure.
However, if you add a custom domain with Blogger, you cannot turn on “HTTPS redirect” until DNS Propagation is complete. At this time your “HTTPS availability” Status: Pending will show. In this case there is nothing to worry about – you need to wait 24 to 72 hours for DNS Propagation to complete and SSL to be Active and “HTTPS redirect” to be turned on.
Redirecting Blogger website from HTTP to HTTPS is a simple and very important step. This increases the security of your blog and provides a safe browsing experience to your visitors. Additionally, using HTTPS can help you increase your blog’s search engine ranking. By following the above mentioned steps you can easily enable HTTPS on your Blogger website and ensure a secure and trusted website.

